So I am just not getting a break......now my daughter has the stomach flu...I mean the stomach flu!! I've never seen vomit like I did last night! So getting posts up has been nearly impossible....and I saw an idea similar to this somewhere, but my head is buzzing from absolutely no sleep and I can't even begin to remember where....
(Quick Update: Here is the link for the original idea....she used ribbon rosettes. I'm not sure if you make those or buy those....)
So on that happy note....this project cost me next to nothing!!
We had a bunch of leftover canvases from a youth event and I painted it with the leftover red from my Christmas Joy Blocks.
I only put one coat of red paint and you can still see an outline of the previous painting....but I knew that I was going to be covering it up....
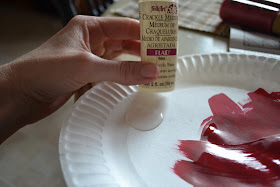
After the red was dry, I brushed a coat of crackle paint.....put it on thick. I wish that I had done my thicker so that I had better cracks....
You then need to patiently wait for the crackle finish to completely dry.....because I'm sooo patient I waved it around a little.....that may also have contributed to my not-so-hot-crackles!
Now the crackles didn't start right away.....I brushed on my cream acrylic paint and as it dried I got some nice cracks....
Now honestly, at this point, I was a little worried....it didn't look quite like I expected it to....but I still started making some crepe paper rosettes. (Make them like my Tissue Paper Roses from my Valentine Wreath.)
Before I started to hot glue, I arranged the rosettes in a heart pattern....

Now if I had a cool vinyl machine, I would just whip out some vinyl words.....I don't so I needed to get creative! DaFont.com has awesome FREE font downloads....I found one that I liked, downloaded it into my word program and printed it.....
I had a fabulous idea to color the back side with chalk and then "trace" the letters on my canvas......it didn't work....it didn't transfer onto the paint....the crackle paint made it too rough.
Instead I cut out my letters with regular scissors...snipped the "v" right in half and outlined it in pencil on the canvas.....
I got as far as "Love never" and gave up....it just looked sloppy and was hard to do, so the canvas sat on my fireplace saying "Love never" for a few days.....my kids kept asking what that meant!
Then my husband came along and suggested lightboarding.....hmmm is that like waterboarding.....I'm not so sure about that....
I guess lightboarding is where you hold something "see-through" over a light and then trace....amazing! I never would have thought to do that!
He helped me with a fancy-schmancy real art lettering brush and fixed up my letters....we (he! ) just painted them in with black acrylic paint...
I stapled a length of ribbon to the back and hung......but quite honestly, vinyl would have be alot easier to just stick on!!
With the craziness of life right now....I needed a simple mantle! I ripped the ribbons off of my "Jesus-candles" (see here to get the whole story on those!) and dumped the rocks out of the Williams and Sonoma knock-off vases .......made a couple extra rosettes and glued them on my Epsom Salt Jars and stuffed a red candle from The Dollar Tree in them....
So really....my only expense was a $2.00 bottle of crackle paint and $1.00 worth of Dollar Tree Ribbon because I had everything else around the house...
Now....I am off to disinfect!!
Linking up with:


LOVE IT! and it looks so great on your mantel that I love too. Thanks for linking. Jen
ReplyDeleteThis is so pretty! It's simple, but it has a great impact! Love it! : )
ReplyDeleteI love this-so cute and creative-I'm your newest follower-Stop by for a visit!
ReplyDeleteLightboarding - what a great tip! Thanks for sharing with the rest of us who are not cool enough to own a vinyl-cutting machine of any kind! :)
ReplyDeleteDarling! This is so cute and it looked easy enough even I might be able to do it.
ReplyDeleteThis turned out beautifully... it's the bible verse we had read at our wedding. :)
ReplyDeleteHave a great weekend,
Liberty
Love your adorable sign! I'm featuring it in the PoPP Spotlight.
ReplyDelete