Showing posts with label refinishing. Show all posts

December 5, 2010

Antiqued Table

I just had to share this picture of the table refinish that my friend, Cheryl did.......all with spraypaint!!


Isn't it just GORGEOUS!!!

Here are her instructions:

"I did it in 3 days and it wasn't all day either. Just a few hours. I primed it with Rustoleum Ultra Cover, sprayed it with Rustoleum Ultra Cover Satin Heirloom White and then attacked it with sand paper. I used Minwax dark walnut stain and just applied it to a small area and then polished it with a rag, wiping most of it off. It really didn't take long at all and it looks kind of like a boy ran into it with an atv and then used it for a tool bench. Hmmm...maybe I should do this to all of the wood in my house so people think it's supposed to be like that!  (She has 3 boys!)  Cost was about $30 or so."  

Spraypaint is amazing!!  (....and isn't her centerpiece adorable!)

(Cheryl followed my instructions for how I refinished my Craig's List kitchen table and chairs if you'd like more detailed directions and photos.)


Read more ...

November 18, 2010

How to redo kitchen chairs....


Well....the whole reason that I was on Craig's list was to look for chairs.  We bought our kitchen chairs at IKEA about 7 years ago expecting them to be "dining room" chairs.....aka chairs that are to be "looked at" but never used.

Much to the chagrin of my MIL....we converted our dining room into our homeschool classroom and the DR chairs became our kitchen chairs.


IKEA chairs are awesome, but these were never meant to withstand 3 meals/day, science experiements, lego battles, and hold cute little bear-girls.....they were cheap, people, and I even used a coupon!!!

After both my hubby and dad trying to piece them back together....one day I again pulled the back off and had really had enough.....so I took to Craig's list.

There I saw advertised:  Table and 4 chairs $30!!!!  WooHoo!!! 

Now this was one of my first experiences purchasing off Craig's List and I had no idea that it can be rather cut-throat.  Thankfully, this family was ALSO a Christian homeschooling family (which I didn't know until we picked up the set) and didn't sell our table out from under us!

I don't have pictures of the chairs before.....but imagine this:

....with a WHOLE lot more scrolling on the back and they were that ugly 80's wood.

I soon got a little tired of sanding/filling/sanding/filling and my nose was truly just FILLED with wood-filler dust!
It was at that point that I got a little inspiration (some may just call it being lazy!).

I remember my Grandma having old black chairs that looked so worn that the scrolling was all faded and rubbed away....I decided to go for that look....


Instead of worrying about the scrolls being completely filled in, I left some texture to it......
(Yes...you are catching a sneak peek of an upcoming Christmas craft idea in the corner....close your eyes!)


I loved it!!!  It's hard to see in the photo, but the back is actually smooth....you can't really feel the scrolling, you can just lightly see it.

I did the chairs just like the table except that I didn't buy anymore KILZ primer....it was just TOO expensive to use on 4 chairs.

I bought a can of el-cheapo black spraypaint primer......one can covered about 1 1/2 chairs.

I then sprayed the chair in Rustoleum Canyon Black:


(Oops...yes I done stole that photo off of Yahoo images....please don't turn me in!)

It took 1 can per chair at a cost of about $3.79 per chair......but think of what it would have been like to brush paint onto all of those spindles!!!  Grueling........they would still be sitting in my garage!!


I was VERY nervous to "antique" it....but after spraying, I decided to rough-up all of the edges with sandpaper and it looks gorgeous!!!

I think it matches exactly what I picture my Grandma's chairs to be!


This was one of the bigger projects that I've ever undertaken and I was really nervous that I wouldn't see it through.....but spraypaint is just so quick and easy to use that the project really only took a couple of days!

Total Cost:  Table and 4 chairs---$30
1 can Kilz---$4.99  (used for the table)
2ish cans primer---$6.00   (I had one at home already)
2 cans Krylon ivory gloss---$6.50 (it was on sale!)---used for the table
4 cans of Canyon Black----$16
polyeurethene----free, I already had some

Grand Total:  $63.49 for a brand new to me table and chairs!
     

Happy Spraying!
Read more ...

November 13, 2010

Craig's List Find: Refinishing an old ugly table

I wasn't looking for a table, but I was searching Craig's List for chairs.....because years ago, someone---who will not be named----sat in our chair at a Christmas party and broke it and it's never been the same since! 

When I pulled the back off for the 600th time, I decided to check Craig's List.

And that is when I saw a listing for a table and 4 chairs for $30!!!!  I had been learning about the power of spraypaint and felt ready to tackle this project!


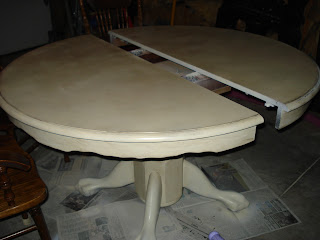
The table had an awesome structure, but it was surrounded with this carved scrolly-type etching.  It was everywhere and quite overpowering, so I decided to fill it in with this:

I ran over to my local True Value hardware store and grabbed a little jar of Zar wood patch.  (I should have grabbed the BIG jar, because 3 small jars later.....grr!)

And then I sanded.....and sanded....and sanded and THEN I realized that my husband has a orbital hand sander.....Why don't I think of these things to start with????

After dust was EVERYWHERE, I pulled out my KILZ spray paint primer.  As a homeschool family, we use our kitchen table ALOT....so I knew that this table needed to withstand 3 meals/day, science experiments, lego battles, spilled drinks......I needed the power of KILZ!

KILZ was a little expensive at our hardware store...$4.99/can, but it was less than the gas to drive to Home Depot.  I used 1 can of KILZ on the top sanding lightly after coating it.


Then I got my Krylon Ivory Gloss spraypaint and started lightly coating the table.


Can you see the layer of dust in my garage???? LOL


I think that I needed about 3 cans of Ivory to completly coat the table and the leaf.  Thankfully, it was ON SALE!!!  at True Valuefor $3.22/can. (They often put their spray paint on sale and carry both Krylon and Rustoleum brands!)  I think that it's somewhat cheaper at Wal-mart, but again.....the drive....

(I think that it was at this point that my neighbor walked over and asked me what color I was going to paint the table.......uhm.....it's already painted?!?)

After letting it dry, I started the sanding and glazing process.  YES....sanding again!!  I went along all the lines and using a piece of folded sandpaper, I roughed it up.


I then took glaze....unfortunately, I borrowed some from my mom, so it came in an old Folger's coffee can!  But you can make it by buying Behr Glaze and having it tinted.  You may have to ask Home Depot for assistance there.  I have often used stain to "antique" my furniture, but the glaze worked much better.

I was able to give the table depth by rubbing on the glaze and wiping with a damp cloth.  I applied the glaze heavier to my sanded areas.

I would do some glazing and then step away for an hour so that when I returned, I would have "fresh eyes."  I could see areas that I had missed or areas where I wanted the glaze darker.

After the glaze dried, I sprayed a clear coat of spray paint polyacrylic sealer, but then realized that the table would be heavily used and needed something stronger.


Since I already had some of this Minwax Polyacrylic satin finish.....I brushed about 3 coats on.


And here she is....in all of her glory....


She wipes off SOOOO easily!!


But wait......wasn't the whole reason that I was on Craig's List was for the chairs?????????? :)

I'll show you those later!!

Read more ...
Related Posts Plugin for WordPress, Blogger...