Showing posts with label knock-offs. Show all posts

May 26, 2011

PB Knock-off Clock


{A $2.00 piece of wall art....}


I've had this project sitting forever!  I started it back before I had a blog....and I just finished it this week!


Since I was never planning on "posting" about it, I didn't take pictures of the original steps.  Here's my best attempt to recreate.....


I was originally inspired by Alchemy Junk and her version....she gives a great tutorial for how to make the wood look old!

I started with an old piece of plywood.....we use it every year to put our Christmas Tree stand on it....guess, I'll need to get something new for next year!


I painted my wood with a white base....I then tried to age mine by mixing multiple acrylic paint colors or red, yellow and brown.  I never quite did achieve the rust color that I was going for.....


I didn't really have to "age" my piece of wood too much.....it was already pretty beat up.  I just tried to make the holes look "rusty."  I also went over it with glaze to "age" it.

You can see in this next picture all the colors that I added when painting.....I just kept layering....if something looked too dark, I would take a wet paper towel and smear it around....


I used the glaze to draw my circle....I first drew it with a pencil and had to erase multiple times...and yes, I did try the whole thumbtack/string idea...I don't know what the problem was! (It's probably that whole exact measurement thing...)


As I have mentioned before, I have no type of fancy cutting machine.....I only had a printer that was running out of ink!


I picked the Times New Roman font because it had the word "roman" in it and I figured, hey...."roman numerals!"  I printed it out...holding my breath that it would do all the numbers before running out of ink!


I used black acrylic paint to paint on the numbers and then took sand paper and roughed them up.....


And yes....I know that the numbers are wrong......all the numbers are supposed to face in toward the middle......the hubby didn't like it like that!  It's all about compromise....sigh!


Cost: 
Wood:  free, an old junked piece
Glaze:  free, had it
Paint: $2.00 for 2 bottles of acrylic paint in red and yellow
Total:  $2.00!!


Now I'm on the look-out for some rusty clock parts!
PLACES I PARTY....
Read more ...

April 11, 2011

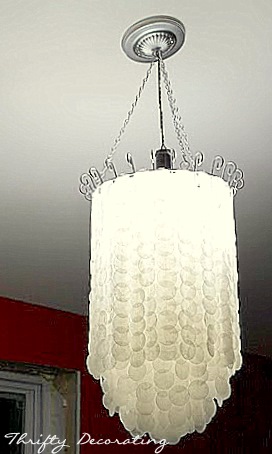
Faux Capiz Shell Chandelier

{Faux Chandelier by Christi}


This is my friend Christi....


I am realizing that I have a lot of friends named Christie! or Kristi, or Kristie.....This chandelier was done by another friend names Christi....she graciously took pictures along the way to share with us how to make a beautiful Capiz Shell Chandelier out of WAX PAPER!!!!  Here are her instructions....

----------------------------------------

Here's what you need:
Scissors, circle punch (I used 1 3/8", but you can suit the size to your liking), wax paper (I used 3 rolls), an iron, 2 pieces of parchment paper


This is a type of chandelier I have always drooled over. Being the cheapskate that I am, I have never indulged because they can cost from $300-$2000!  Imagine my excitement when I found online instructions for a DIY faux capiz shell chandelier made from wax paper at The Little Apartment. That I can afford!

I started with a white wire hanging plant basket. This will be the frame of your chandelier.


I spray painted it silver.


Next, I cut three sheets of wax paper to the same length.  I then sandwiched them together and placed them between the 2 sheets of parchment. You need to iron until fused. Keep going until you have all of your sheets fused together.


I then took all of those fused sheets of wax paper and used the circle punch to make the faux capiz shells.


I then made rows of "shells" with tops overlappin​g (I made rows of 13)...for this part you will need scissors, thick white thread and a hot glue gun.  You also want to be sure to line them up on some type of guide so that they are straight.


I then cut thread to extend partially over both sides of my row.  You will need to anchor one side down. You can see I used one of my husband's heavy pliers.


I then placed a small glob of glue on the thread near the top of each circle and pushed it down against the "shell" to attach it.
I found it easiest to hold the other side of the thread while I made my glue dots, but if you can think of an easy way to anchor both sides, I recommend doing that.


After the glue dried, I started at the middle of the basket and would tie and hot glue the "shell" strands. I tried to stagger mine and put them every 2 or 3". You will need to trim any loose thread ends.


You will need to keep going until the basket is covered. This is partially done, but in the spot where it will permanentl​y hang.


It is so easy to be married to a jack-of-al​l-trades..​especially when he can do all of the things that I don't know how to do...like get electricit​y to the lamp! Finished product...​and we love it!

Total spent, about $15!

The wire basket being 2/3 of that price because I fell in love with the twirled wire at the top...and here I come to find out that you can get them at the dollar store. (Of course, Nicole would have known that.)  My next project...​twine ball chandelier​s for my dining room...of course I have to wait for my dining room to be remodeled.......

----------------------------------

Christie.....thank you SO much for sharing that tutorial with us.  I imagine that your chandelier is looking gorgeous in your newly remodeled kitchen!  I can't wait to see your twine ball chandelier....PLEASE take pictures again!


Linking up with:


Read more ...

February 28, 2011

Guest Post: Ballard Knock-off


{Ballard knock-off print}

hi everyone, I'm Alison from


Stuff and Nonsense


i'm happy to be
guest posting here on thrifty decorating
and i crafted this project just for the occasion
i called it my
ballard catalog print knock-off
when the last ballard designs catalog
made it's way into my mailbox
one of the items that
caught my eye
was this glycee print on canvas


and i wondered
if i could make something similar
i culled my raw materials from around the house
instant coffee
pages from an old and unloved book
a canvas board
decoupage medium
black construction paper
using the original as a guide
i cut out my book pages into shapes


i mixed the instant coffee with hot water
to dye some of the paper strips

and let them dry for a bit

then i dry fitted the paper pieces onto the canvas board

when i had them just right
i carefully began pasting them down
and covering the entire board with decoupage medium


after drying a couple hours
i second coated the whole thing
the next step
was to 'age' the art
with a mixture of
decoupage medium
water
brown paint


which was too dark

but after a few more tries
i got the desired color


i brushed the tinted medium on
and let dry


finally

i spray coated with a clear glossy coat
for the shiny finish i wanted


the total cost: $0
since i already had the materials

time spent: a lovely afternoon

payoff: total thrifty satisfaction

--
Visit my websites: 
http://stuff-and-nonsense.net


--

Thanks so much for sharing!
Alison has other amazing ideas over at her blog Stuff and Nonsense!  We went to the same college way back and she still lives in our college town in a 100+year old home lovingly called the Duff House that she is restoring.
Here are some of her amazing transformations!


I also like how she turned this:

....into this!

I love Alison's crisp, fresh style!  (and she homeschools, too!)  If you get a chance, check out some of her ideas at ......


Stuff and Nonsense


Read more ...
Related Posts Plugin for WordPress, Blogger...