August 31, 2011

Thrifty Thursday #24

Confession.....this week has kind've kicked my backside.....I really try to "under" schedule myself (my family is laughing right now because I often fail miserably at doing that!)...but sometimes there are weeks where I get no break.....and this was one of them....


My fall piano lessons started and somehow from last year....my number of students has at least doubled....my kids started full days of homeschooling and I had numerous doctor appointments to run people to.....Do you ever have weeks like this??


My daugher's comment today...."Mommy, are you drinking Mountain Dew again??"  
Me....."Shh....don't tell, Daddy!"


So...while I tried to comment on all of your projects, it just didn't happen and I probably didn't even get to half of you.....Just know that I love looking at all of your ideas and even if I don't tell you...I luv' ya!


So here is a highlight of projects from last week's Thrifty Thursday.


How cute is this plaster tic-tac-toe board from Suzy's Artsy Craftsy Sitcom?


These candlestick holders from Burton Avenue were made from cereal boxes....yes!....cereal boxes!!


Eat Cake for Dinner outdid herself with these homemade snickers bars....YUM!!


I featured this on my FB page, but this felt make-up from Gluesticks was too cute not to feature again....what little girl would not love to play with this!


I just love this DIY jewelry holder from Crafting and Creativity.....in fact, I already started painting my own cabinet door to make one!


Conspicuous Style has a wonderful tutorial for how to make these monogrammed lampshades.....


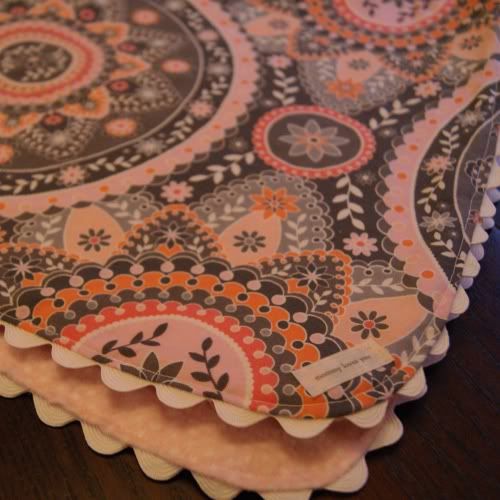
This ric-rac blanket from Happy Hour Projects is such a cute gift idea and Adrianne says that it can be completed in an hour!


If you were featured this week, be sure to grab a button!


Here are some very simple suggestions for the party:

1. Please become a follower of Thrifty Decorating.
2. Be sure to link to your POST and not your blog.
3. Please copy and paste my link button somewhere in 
your post or blog so that others can link back.


After you've linked here, hop over and say "hi" 
to Johnnie at her Thrifty Thursday link party
ThriftyThurs SBLC Buttons


You can also head over to visit Erika 
at Thrifty and Fabulous and join 
her Thrifty Thursday!

Let's begin week #24 of  Thrifty Thursday!


Read more ...

August 30, 2011

Old Book Wreath...


I just love the blog {show & tell}......Sasha's style is simple and beautiful.  It was her half bath that inspired me to get into gear and start painting my own!  I plan to totally and completely copy how she updated her bathroom mirrors....it's beautiful!  I'm just saving money to purchase the mdf.....


So when I saw her old book wreath, I knew that I wanted to do that in my bathroom, too!


Here is what I used:


As I was shopping for a book with yellowed pages at the Goodwill, a woman looked over and said..."Oh, I really like that author!"  


To which I replied....."Oh, I'm not going to actually read it, I'm just ripping out the pages for a craft..."


Then, I got the look......the "oh..you're kind've weird" look!


Now....I thought that I double-checked to make sure the book was "clean", but as I was ripping pages out, I realized that I needed to strategically fold......if you get when I'm sayin'!  That's all I need my guests (or sons!) to notice in the bathroom!


I had a bunch of straight pins leftover from another project, so I just used them.....I made a number of circles of pages to give it layers....


I had some old burlap leftover from another project and added a hanger with some hot glue and voila.....a $2.00 addition to my bathroom!  I may still go back and add some distressing ink to the edges to give it some dimension....if I ever have some "extra time."


I just love cheap and easy crafts!

Read more ...

August 29, 2011

During a hurricane....


So what does my family do during the end of a hurricane....


Well.....we climb on the shed roof and try to fly homemade kites made with plastic grocery bags and string....


......all while wearing our winter coats.....


What did you do?


Read more ...

Finally....my half bathroom reveal


So I've been working on this project for a couple of weeks.... I've been interrupted by an earthquake, a hurricane, a rabies scare and another pest scare that I'll save for a later post......you don't even want to know, but it involved me crawling on my son's floor with a flashlight and magnifying glass...BIG *sigh*!


At some point in my "distant" decorating past, I preferred darker colors and a more country feel....recently though, I've been moving toward the light...can I get an "Amen?!"


I am just loving the lighter colors!! Look at that difference....


I can't give you the exact color of the walls, because I took a gallon of blue that my friend gave me and just started dumping white (exterior!) satin paint in it to lighten it.......yes, I was walking on the wild side!


I swapped out our light bar with a light that I purchased from the local thrift shop.....for $4.00!!


I gave it a coat of Oil Rubbed Bronze from Krylon and it was as good as new!


I spraypainted all of my hardware.  I sprayed my towel holder, the toilet paper holder and my light switches with Krylon's Oil Rubbed Bronze.   


If you'd like to know how I did the light switches, you can go HERE and read an older post on it.


While my walls went lighter, my cabinet went darker.....I got permission from the hubby to paint it and I chose this color black from The Lettered Cottage.


You can read more details about how I made over my cabinet HERE. All that I used was beadboard wallpaper, paint and a satin polyurethane sealer. 


If you look carefully, you can see that I added a $3.00 piece of trim on the back edge and floor to give the beadboard a more finished look.


I purchased the same trim as I used HERE in my kitchen remodel....the price just went up a few cents!


I am not completely finished.....my Roman shade didn't quite work, so I need to get some more tension rods and "fake" it and then get white blinds to hang under the material....


I also ran out of money with the cat expenses and I'm waiting to purchase some MDF....I can't wait to show you how I plan to trim out the mirror.....it will match the cabinet and add the final "pop" to the room!


Here's my cost breakdown:


Paint:  FREE....leftover from a friend
Cabinet paint*:  $21 after a $5 rebate
Spraypaint:  free...already had it
Candlestick:  $0.50 from Goodwill
Bookwreath:  $1.00 foam from The Dollar Tree 
           $1.00 book from Goodwill
Light:  $4.00 from Thrift Store
Curtain:  $5.00 for fabric from Joanne's
Accessories:  Free....pulled from other rooms!

TOTAL:  $32.50 but really, I only used about $4.00 worth of paint!
The true cost would be.....$15.50!!!


*I've been using the black paint everywhere so it was well worth the purchase of an entire gallon!


I just love how you can make BIG changes for little money.....

Don't forget to enter my UPrinting Giveaway!!


Read more ...

August 28, 2011

UPrinting Giveaway....

For many of you....it's back-to-school week!  Woohoo!  It's been a while since I've done a giveaway so this seems like a great week to celebrate with a giveaway!  


Are you familiar with UPrinting?  If you enjoy using online printing, then UPrinting offers all the services that you could possibly need....


I love their canvas prints....


How about some greeting cards....
UPrinting's list of products offered is extensive, covering everything from UPrinting business cards and event tickets to letterhead printing and envelope printing!


So what can YOU win?........letterhead!


They recently contacted me to see if one of my readers would like to win 500 pieces of letterhead!  I would love to create beautiful letterhead stationery!

Prize Details
5.5" x 8.5"
70lb Offset
Front Only Printing
4 Business Days Print Turnaround Time
*Free Shipping
Restriction: Limited to *US residents 18 years old and above only
Please note:  If you have won a UPrinting giveaway in the past 6 months, then you are not eligible to enter.

Over an $80 value!!


To Enter:  
Become a follower of Thrifty Decorating and leave me a comment telling me that you are.
Additional Entries:  "Like" UPrinting on their FB page and leave me a comment telling me that you did.


Share This:  If you link back to this giveaway on your blog or FB page, then leave me a comment telling me that you did!
  
A winner will be selected on September 1st.

Thanks so much for reading and following my blog!


This giveaway is sponsored by UPrinting, no monetary compensation was given and I will receive letterhead printing service by hosting. Letterhead design and envelope printing is also available. Please visit UPrinting.com for more details.
Read more ...

August 26, 2011

Make your own reading pillow.....


Let me first start this post by saying that I like to sew, but I do NOT like sewing machines......what should be an easy project turns into a monster because of thread tension and other various annoyances!!


So...if you have a machine that works, this is a VERY easy project!


I first saw this idea here at Southern Disposition.  I tried to find an IKEA duvet as inexpensive as her, but they are not that cheap anymore, so I went with a twin flat sheet.  The whole project then cost me under $10.00!!


I took my sheet and laid it longways or lengthwise on the floor. I then took 4 pillows and set them out so I knew where to cut off the extra length of sheet.


When you cut off your extra length you will be left with a raw (or unhemmed) edge.   You will need to fold-over that edge to hem it.


To hem, I just make a fold and iron it.  


I then "fold over my fold", iron, and stitch.


Now, take your sheet that is stretched out lengthwise and fold it into third.  Because you have folded your sheet in thirds, you will have created a pocket for you pillow....


I then grabbed my pillows and laid them out side-by-side again to measure where I needed to put my seams....each pillow will have it's own "pocket."


Pin a line against your pillow and then sew to create your pillow pocket...


You've now created a pocket to stuff each pillow into...if this is confusing to you, go grab a pillow sham off your bed.  


The back of this pillow looks identical to the back of your pillow sham if you've done it correctly.  You will just have 4 "connected" shams....


See...cute pocket!


Since I bought my 4 pillows and flat sheet at IKEA, the total cost was about $10.00....


....reading Berenstein Bears under the shade of a tree....priceless!

Read more ...
Related Posts Plugin for WordPress, Blogger...