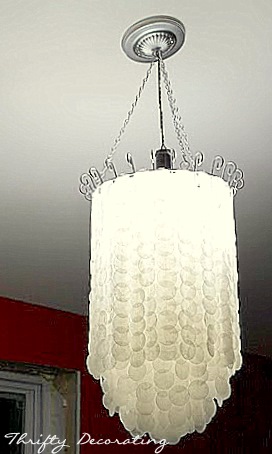
{Faux Chandelier by Christi}
This is my friend Christi....
I am realizing that I have a lot of friends named Christie! or Kristi, or Kristie.....This chandelier was done by another friend names Christi....she graciously took pictures along the way to share with us how to make a beautiful Capiz Shell Chandelier out of WAX PAPER!!!! Here are her instructions....
----------------------------------------
Here's what you need:
Scissors, circle punch (I used 1 3/8", but you can suit the size to your liking), wax paper (I used 3 rolls), an iron, 2 pieces of parchment paper
This is a type of chandelier I have always drooled over. Being the cheapskate that I am, I have never indulged because they can cost from $300-$2000! Imagine my excitement when I found online instructions for a DIY faux capiz shell chandelier made from wax paper at The Little Apartment. That I can afford!
I started with a white wire hanging plant basket. This will be the frame of your chandelier.
I spray painted it silver.
Next, I cut three sheets of wax paper to the same length. I then sandwiched them together and placed them between the 2 sheets of parchment. You need to iron until fused. Keep going until you have all of your sheets fused together.
I then took all of those fused sheets of wax paper and used the circle punch to make the faux capiz shells.
I then made rows of "shells" with tops overlapping (I made rows of 13)...for this part you will need scissors, thick white thread and a hot glue gun. You also want to be sure to line them up on some type of guide so that they are straight.
I then cut thread to extend partially over both sides of my row. You will need to anchor one side down. You can see I used one of my husband's heavy pliers.
I then placed a small glob of glue on the thread near the top of each circle and pushed it down against the "shell" to attach it.
I found it easiest to hold the other side of the thread while I made my glue dots, but if you can think of an easy way to anchor both sides, I recommend doing that.
After the glue dried, I started at the middle of the basket and would tie and hot glue the "shell" strands. I tried to stagger mine and put them every 2 or 3". You will need to trim any loose thread ends.
You will need to keep going until the basket is covered. This is partially done, but in the spot where it will permanently hang.
It is so easy to be married to a jack-of-all-trades..especially when he can do all of the things that I don't know how to do...like get electricity to the lamp! Finished product...and we love it!
Total spent, about $15!
The wire basket being 2/3 of that price because I fell in love with the twirled wire at the top...and here I come to find out that you can get them at the dollar store. (Of course, Nicole would have known that.) My next project...twine ball chandeliers for my dining room...of course I have to wait for my dining room to be remodeled.......
----------------------------------
Christie.....thank you SO much for sharing that tutorial with us. I imagine that your chandelier is looking gorgeous in your newly remodeled kitchen! I can't wait to see your twine ball chandelier....PLEASE take pictures again!
Linking up with:


12 comments:
So beachey! Love it!
This is beautiful...gorgeous but worth all of the hard work!
It's beautiful!! Great Job:)
This is amazing! Awesome that she made this, Beautiful!!!!
Not only is it gorgeous, but very well explained! Fantastic job! Please stop by for a "featured at" button.
Holy Mole-y, I love it!! You rock! (And you're patient too)! :)
Sheila
ingenious...how do people think of stuff like this? thanks for linking it up to ff!
alison
Get outta town! This is amazing!!!
SOOOOOOOOOO ROCKIN!!! Love IT. I am going to make of these for my bathroom. AMAZING JOB.
I would love for you to link it up at our link party going on now.
Amy
www.SistersoftheWildWest.blogspot.com
Thank you soo much for posting this.. this is just soo beautiful I wanna make one too.. I didnt find parchment paper any where here is there any alternate for it .. please help.. Thanks soo much
Hi, I used empty milk gallons. Cut in desired size and hanged with craft wire and finally sprayed partially with silver and gold spray paint. Awesome results. Got so many compliments.����
تكييف الهواء هو جهاز يثبت في الغرف أو السيارات ونحوها، وتديره القوة الكهربية، لتقوم بخفض الحرارة فتبرد الجو في فصل الصيف أو يتم رفعها في فصل الشتاء حتى تقوم بتدفئة الجو، ويوجد العديد من أنواع أجهزة التكييف فمنها ما هو مناسب للمنازل ومنها ما يناسب الشركات والمصانع وحتى المراكز التجارية والمعروف عن أجهزة التكييف هو حاجتها للتنظيف باستمرار وبطريقة معينة حتى لا تتسبب الأتربة في تلفها.
شركة تنظيف مكيفات بخميس مشيط
يعتبر التكييف من أساسيات الأجهزة الكهربائية في المنزل بسبب درجات الحرارة المرتفعة، لذلك يحرص الجميع على تنظيفه باستمرار من الأتربة أو الشوائب للحفاظ عليه من الأعطال والتلف
يوجد العديد من الشركات التي تتيح خدمات تنظيف المكيفات و لعل من اهم تلك الشركات شركتنا و التي تعد واحدة من اهم شركات تنظيف المكيفات بالاعتماد على احدث الاجهزة و المعدات و بتنفيذ امهر العمال و الفنيين.
شركة تنظيف مكيفات
Post a Comment