October 19, 2011

Thrifty Thursday #31

Last week, I was late putting up  Thrifty Thursday because we were enjoying NYC...


We saw some of the protesting taking place there.....


It was a great way to throw in a little civics and review our amendments!  I stopped short of making my kids recite the preamble....although they do know it!


We visited the Sony Wonder Technology Lab and got to do virtual surgery, "work" in a TV studio and experiment with tons of other fun gadgety activities....and did I mention....admission was FREE!


We also grabbed some candy at FAO Schwartz....that wasn't free!!  That candy was like $15.00 per POUND! Those bags probably cost $4.00 each!! C-razy!


Last week on Thrifty Thursday there were two projects that I picked as my "favorites!"


My first "pick of the week".....this absolutely ADORABLE pumpkin from Simple Simon & Company made from thrifted books!


My second favorite of the week.....these "make your own hotpockets!!" from Joyful Homemaking!  How clever! (and anyone on the staff of LCBC...that one is for you!)


There were SO many other wonderful projects linked up this week.  Here are just a few!

Spruce Your Nest created this very unique tea light holder...


Crafting and Creativity shared this really fun kid's fall art idea....


The Country Chic made-over this sideboard into a beauty!!


Amelia Bedelia shows us how to take an average wall and add a beautifully painted fake fireplace!  I can't wait to see the end result!


I just love this homemade sign from Harbour Breeze....
......Rita even shows you how to put the planks together to create the wood for the sign!


Home Frosting shared how to transfer a design onto fabric.....and the painting that she designed was just beautiful!


If you were featured this week, feel free to grab one of my buttons!


Here are some very simple suggestions for the party:

1. Please become a follower of Thrifty Decorating.
2. Be sure to link to your POST and not your blog.
3. Please copy and paste my link button somewhere in 
your post or blog so that others can link back.


After you've linked here, hop over and say "hi" 
to Johnnie at her Thrifty Thursday link party

ThriftyThurs SBLC Buttons


You can also head over to visit Erika 
at Thrifty and Fabulous and join 
her Thrifty Thursday!


I can't wait to see what you link up this week!


Read more ...

October 18, 2011

Homemade Donuts. . . .


One of our favorite places to visit as a family is Ocean City, New Jersey!  My husband spent his summers there as a child and we are enjoying passing down traditions from "the shore" to our children!


One of our favorite places to visit in OCNJ is Brown's Donuts....the 5 of us could easily devour about 2 dozen in one sitting! The only problem....each donut costs $0.75 cents and that adds up quickly!!


When my friend Alison from Stuff and Nonsense posted about how she made homemade donuts for Labor Day, I was intrigued.....she claimed that her family "raved" over these donuts....could they be as good as Brown's??


What I loved MOST about Alison's recipe is that they were made with these ingredients!!


Yes....refrigerator biscuits!!  I didn't have to mix anything!!


I followed Alison's suggestion to cut the donut holes with a plastic lid....I actually put my kids to work doing that!


One BIG suggestion.....it takes all of about 10 seconds to fry these things per side....


...in the time that it took for me to snap this picture, I almost burned them!!


We had a fun time making different toppings....cocoa mixed with sugar to make chocolate, powdered sugar and regular sugar!  


I am thinking that next time I may add some water or milk to make a glaze out of the chocolate and powder.....yum!


The best part.....faces covered in powder saying, "Mom...these are even better than Brown's!"


Yes....your children will rave!!

Read more ...

October 16, 2011

Frame your bathroom mirror. . .


When I think about remodeling a room, usually, my main influence is the bottom line.....how much is it going to cost?  Most often, I am working with a very minimal budget!

When I started remodeling my downstairs half bathroom, I knew that I wanted a change from the red, but I didn't have a lot of money to spend....


I started with a can of blue paint that my friend, Erin, had given me and lightened it by dumping exterior white paint into it.....not the most scientific of lightening techniques, but it worked and was FREE!!


Once I lightened my walls, I darkened my cabinet by painting it black...


I also added beadboard wallpaper to the doors and side of the cabinet to give it a different look....the cost for this??  NOTHING because I had leftover wallpaper!!


But the room was still missing something.....a cool frame for the mirror!  Months ago, I had seen a tutorial by Sasha at {show & tell} and I knew that I wanted to recreate it...cheaply!!

I went to Lowe's and bought two 4 x 4 pieces of MDF. Have you discovered MDF yet?  It's amazing!!  Handles like wood and reasonably priced!!  I think that I spent $9.00 for the two pieces.  You can also buy it in larger sheets, but MDF is heavy and I was shopping by myself.


I also had a $2.00 piece of crown molding that I had purchased at the Habitat Restore....it was a little moldy and gross, but I knew that I was going to paint it!


Because I've been slightly overworking my hubby in the basement, I called in reinforcements.....my dad!  It took him all of about 60 minutes to put this together!  He took measurements of my mirror, cut the MDF to fit and attached the crown with nails and glue....

Then, I painted the frame the same black as the cabinet and distressed it slightly with heavy grit sandpaper...


My hubby was away for the weekend and I was way too impatient to wait for him to hang it, so I went and grabbed some liquid nails off of his work bench.....


I love this stuff.....it's amazing!  But you definitely have to commit that whatever you are gluing is going to be there forever!


Ever the blogger, I grabbed my camera and took a picture while holding the frame filled with liquid nails....good thing I didn't drop it or I'd have a frame permanently attached to my head!!


I wish that I could get a picture of the entire bathroom, but it's very small and I don't have a wide angle lens....you will have to trust me when I say that the frame added the needed focal point.....it looks gorgeous!!

If you add in the $11.00 cost of the mirror, the total cost of my bathroom makeover is still under $30.00!!  

To be exact, the makeover cost $26.50!! 
You can see the breakdown HERE for the other costs!


I just love the difference that it makes....all for very little money!

Read more ...

October 15, 2011

Camera Strap Tutorial. . . .

We spent the past week in the Pocono Mountains enjoying 
fall's amazing colors and spending some quality family time.......


We took school on the road...


hiked in a boulder field.......


enjoyed gorgeous waterfalls...


and drank caramel hot chocolate....


I was also determined to learn how to use my camera to take better pictures....


We've had our Nikon for almost 1 year now and I still have SO much to learn!  But taking excellent pictures is critical to blogging.....


One thing that I have noticed is that many bloggers have these adorable camera straps for their cameras......after taking pictures all week, I was definitely getting "strap burn" around my neck!  Now, I know, that these strap covers are also functional!

Laura Beth From A Step in the Journey linked a wonderful tutorial for a homemade camera strap to this week's Thrifty Thursday....  


I've seen them to purchase all over the place, but this is the first tutorial that I've seen explaining how to make it....(and she made it from an old dog bed!!)


What I love about Laura Beth's tutorial is that she includes lots of PICTURES so that I know what I am doing!!  I need pictures or I just don't follow really well!

So for the complete TUTORIAL for how to make your own, head over to A Step in the Journey!


I've just got to figure out a way to make a manly-looking, but cute strap since my husband and I share the camera.....

Any suggestions???


Read more ...

October 13, 2011

Thrifty Thursday #30

Oh my gracious.....I'm late, I'm late!  We spent the entire day in NYC.....wow, was that another day of a lot of walking!  Do you ever feel like you are both a sheep herder and a referee as a mother???  Yes.....today, I didn't see as much of New York as I would have liked to......I was doing too much herding!


But.....I'm back and ready to get this week's Thrifty Thursday started!  Here are some highlights from last week!


I love this PB knock-off sign from the Crafted Niche .....


Cherished Bliss made these adorable pumpkin cake pops......


Sew Woodsy  painted this gorgeous fall table runner......


This painted pumpkin idea from just the bee's knees would really make a stunning statement on a front porch!


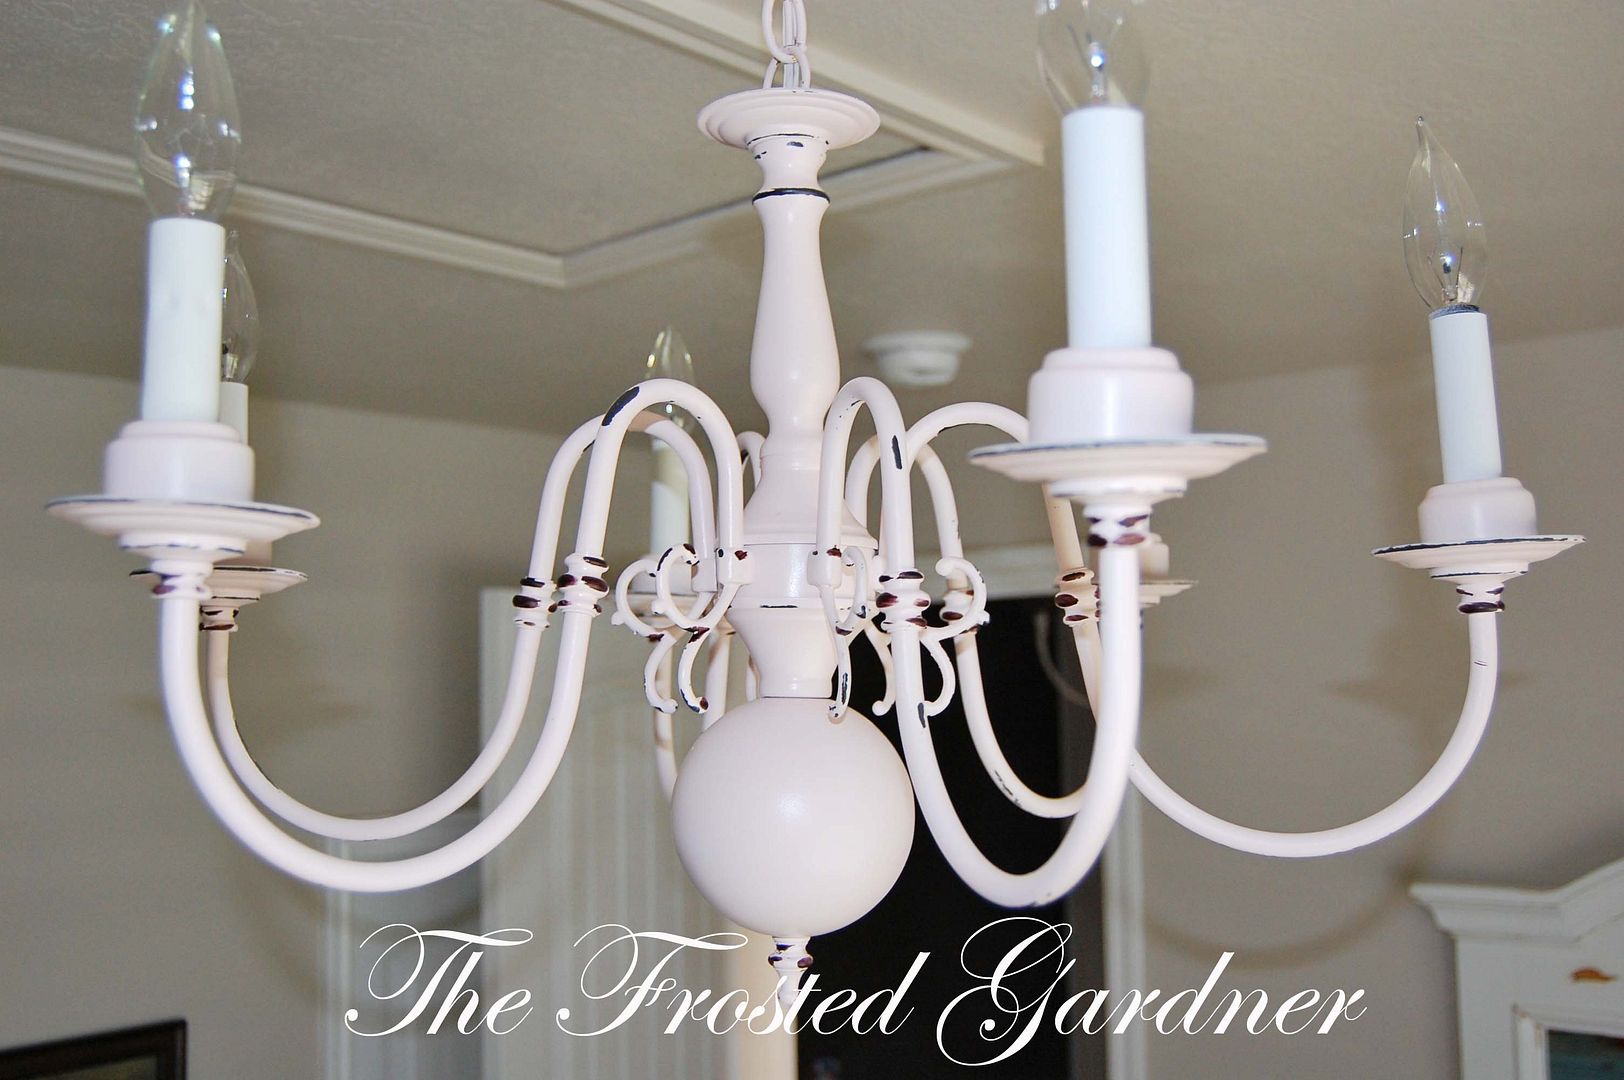
The Frosted Gardner updated her thrifted chandelier and painted it a beautiful pink! 


The Country Chic refashioned her entertainment center using paint and some burlap....

If you were featured this week, feel free to grab one of the new buttons!


Here are some very simple suggestions for the party:

1. Please become a follower of Thrifty Decorating.
2. Be sure to link to your POST and not your blog.
3. Please copy and paste my link button somewhere in 
your post or blog so that others can link back.


After you've linked here, hop over and say "hi" 
to Johnnie at her Thrifty Thursday link party
at Saved by Love Creations!


ThriftyThurs SBLC Buttons


You can also head over to visit Erika 
at Thrifty and Fabulous and join 
her Thrifty Thursday!


Read more ...
Related Posts Plugin for WordPress, Blogger...