November 13, 2010

Craig's List Find: Refinishing an old ugly table

I wasn't looking for a table, but I was searching Craig's List for chairs.....because years ago, someone---who will not be named----sat in our chair at a Christmas party and broke it and it's never been the same since! 

When I pulled the back off for the 600th time, I decided to check Craig's List.

And that is when I saw a listing for a table and 4 chairs for $30!!!!  I had been learning about the power of spraypaint and felt ready to tackle this project!


The table had an awesome structure, but it was surrounded with this carved scrolly-type etching.  It was everywhere and quite overpowering, so I decided to fill it in with this:

I ran over to my local True Value hardware store and grabbed a little jar of Zar wood patch.  (I should have grabbed the BIG jar, because 3 small jars later.....grr!)

And then I sanded.....and sanded....and sanded and THEN I realized that my husband has a orbital hand sander.....Why don't I think of these things to start with????

After dust was EVERYWHERE, I pulled out my KILZ spray paint primer.  As a homeschool family, we use our kitchen table ALOT....so I knew that this table needed to withstand 3 meals/day, science experiments, lego battles, spilled drinks......I needed the power of KILZ!

KILZ was a little expensive at our hardware store...$4.99/can, but it was less than the gas to drive to Home Depot.  I used 1 can of KILZ on the top sanding lightly after coating it.


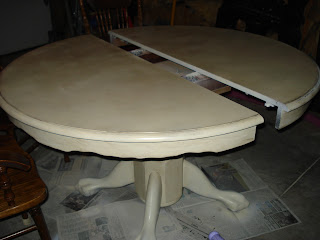
Then I got my Krylon Ivory Gloss spraypaint and started lightly coating the table.


Can you see the layer of dust in my garage???? LOL


I think that I needed about 3 cans of Ivory to completly coat the table and the leaf.  Thankfully, it was ON SALE!!!  at True Valuefor $3.22/can. (They often put their spray paint on sale and carry both Krylon and Rustoleum brands!)  I think that it's somewhat cheaper at Wal-mart, but again.....the drive....

(I think that it was at this point that my neighbor walked over and asked me what color I was going to paint the table.......uhm.....it's already painted?!?)

After letting it dry, I started the sanding and glazing process.  YES....sanding again!!  I went along all the lines and using a piece of folded sandpaper, I roughed it up.


I then took glaze....unfortunately, I borrowed some from my mom, so it came in an old Folger's coffee can!  But you can make it by buying Behr Glaze and having it tinted.  You may have to ask Home Depot for assistance there.  I have often used stain to "antique" my furniture, but the glaze worked much better.

I was able to give the table depth by rubbing on the glaze and wiping with a damp cloth.  I applied the glaze heavier to my sanded areas.

I would do some glazing and then step away for an hour so that when I returned, I would have "fresh eyes."  I could see areas that I had missed or areas where I wanted the glaze darker.

After the glaze dried, I sprayed a clear coat of spray paint polyacrylic sealer, but then realized that the table would be heavily used and needed something stronger.

Since I already had some of this Minwax Polyacrylic satin finish.....I brushed about 3 coats on.


And here she is....in all of her glory....


She wipes off SOOOO easily!!


But wait......wasn't the whole reason that I was on Craig's List was for the chairs?????????? :)

I'll show you those later!!

Read more ...

Christmas gift idea: bulletin board

I have to admit that my idea is in no way original....I took it from here.  But I took her idea and adapted it for my niece.

I started with this:

Since we are past the diaper stage (Can I hear a hallelujah!), I requested some boxes from my friend, Kristi. (Thanks!)  Trim your box to your desired size.


Fold the colored sides so that they face each other with the brown sides facing out.  I didn't have spray adhesive, so I just taped all of the sides together and filled in any holes.


I cut a piece of fabric to fit and began gluing.

I then hot glued the material to the box...folding under the edges on the back to give it a more finished look.


Blurry pictures...I know!  I wrapped the corners like a package so when finished, the back should look like this:

And the front like this:

I wanted to add some embellishment to the front, so I made some torn fabric flowers.


A great tutorial for making these can be found here.


Add ribbon to hang and a bow and you're finished!

A wonderfully, inexpensive bullentin board as a Christmas gift for a little girl's room!

I think that I might go and get pink grosgrain ribbon instead.  The yellow just doesn't contrast enough.

And I have a GREAT idea for thumbtacks....but I need to go make a trip to The Dollar Tree!!  I'll show you that later!

Read more ...

November 12, 2010

Fall Table Runner


I walked into our local hardware store....(I was probably buying spray paint!)...when I saw a display of gorgeous burlap table runners, and I thought....I can do that!

Go to the back of the hardware store and buy some burlap and be sure to insist that it doesn't have words!  (See here for why!)


Then fray your burlap.  They had actually done some neat braiding, but what homeschool mom really has the time to braid hundreds of little burlap strings...NOT ME!  I gathered about 9ish together and knotted them.  I am hoping that this keeps it from fraying.

I went to my old and not a lot of fonts word program and looked for a font that had a cool-looking "G."  I found this and printed it out.


At first I thought that I'd try a chalk transfer.  (You rub the back with sidewalk chalk and trace over it with a mechanical pencil and it leaves a chalk imprint.)  Well....chalk doesn't transfer to burlap!  So....I decided to "trace."


Place your words under the burlap.  You can see through the holes!


Borrow some of your husband's acrylic paint and brushes and start "tracing."


You can make this any length, width, size because burlap is SO cheap!  Hopefully yours will look like this:


(Yes....I seem to be crooked again....ugh!)

and NOT this:


Why does my living room have to be the setting for Lego battles?????
Read more ...

Goodwill frame turned shadow box


Once again.....go to the Goodwill gross and ugly picture section.....Did you know that Goodwill has a DISCOUNT CARD!!!!  For a mere $4.25 you can purchase a discount card for Goodwill. (Doesn't that seem like a contradiction????)  Check your local stores because they run daily promotions.  On Tuesday, I can pick from a fishbowl for up to 30% my entire order....I think this $2.97 frame was "marked down" with my discount to $2.30!


Find a chunky ugly frame....take it apart and spray with Satin Black.  Rustoleum has a gorgeous "Canyon Black" color. (I think that's the name.  I better check!)

You will need a handy husband (or dad) to take their scrapwood and build you a box to attach to the frame.  I'm not sure how he attached it.  I would have used Gorilla glue......

Spray the box. (Don't look at my drip marks....I was rushing!)


Go back to Goodwill (because you forgot to buy anything to put into it!!) and look at their EXTENSIVE glassware section!

Find some matching glassware.

If you are craftier than me, fill it with cute things.  This is in my laundry room and would look adorable filled with tiny little clothes pins, but again, my closest craft store is MILES AWAY...so they sit empty!

I think that I may back the whole thing with this fabric.  What do you think?

Read more ...

Children's Art

Okay---so I am terrible about putting my children's artwork on the wall.  Are you ready for a confessional....

This drawer is stuffed with years! of my kid's artwork.....

The rest go here...

Yes...my children (and husband!) have been known to dig through the garbage to look for special momento's that I toss.  Really, now, can I save EVERYTHING????

Recently, though--after stumbling across my local Goodwill and some amazing blogs, I have come up with this:

(Please don't judge me on my ability to create a straight line....I was rushing!)

Directions:  Go to Goodwill....go to their large selection of gross and ugly pictures.  Find 3 (because I have 3 kids!) frames that look relatively similar.  Bring them home and GET OUT THE SPRAYPAINT!!!

Now....if you are doing it the "right" way and NOT rushing like I was, you will prime them and they will look gorgeous.  If you are in a hurry like me, you get the glossy white out, crack the garage door, throw down some newspaper and start spraying.  Because I didn't prime, they needed a little bit of help.....a few more coats than I would prefer.

Now....our local Walmart is about 20 MILES AWAY (The craft store is like 25!!!!!!!!!).....so getting cute fabric was not an option.  But....we have a True Value hardware store....and they sell burlap....by the foot!!!  It's $0.99/foot, but it's like 60 inches wide.  So I asked them for a foot. 

Of course, they brought out some WITH WORDS ON IT!!!  I kindly looked at the man and said, it was for a craft and I couldn't possibly have words on it.  Giving me a strange look, he went and cut me another piece.

And voila!  A little bit of hot glue and I have a backing for my pictures and my kids art is not sitting in a local dump somewhere!
Read more ...

Christmas Gift Idea...coming soon!


What to do with a diaper box, ribbon and fabric???  I'll tell you soon!
Read more ...

ORB lightswitches and vent covers


When I first started reading decorating blogs, I kept seeing the initials ORB and I had NO idea what they stood for.  Little did I know how those three little intials would change my life.....it has begun a love-affair with spray paint!

(I am sure that my neighbors think that I am absolutely INSANE.....the fumes from spray paint always lingering out from under the crack in the garage door that gives me a slight stream of fresh oxygen....the constant clanging of the metal ball in the can.....)

ORB stands for Oil-Rubbed Bronze and yes, it can change your life too.  Take for instance my vent covers and light switches....


After I finished my "fake" wainscoating in our hallway, I realized that my off-white light switches looked drab compared to the white bottom. So....Krylon's ORB to the rescue.


After a quick trip to our local True Value to see what their $8.00 switch plates look like, I realized that I could do it.

First...prime the switch plate with any Krylon primer.  I had a grey color left over so I used that.  Then....spray with Krylon ORB.  Because little fingers touch this plate alot, I sprayed it with a Krylon clear acrylic sealer.

Tip:  Do NOT drop it on the garage floor upside-down or it will look like THIS! (Oops!)


Go back to the hardware store, buy another switch plate and start over!


And the reveal.....


....it just completes the overall look that I wanted!!


I'm in the process of converting my boring brown...kind've starting to rust vent covers.....and they look GORGEOUS!!  

Here it is the ugly brown:


And with a dash of ORB:
You can't see the flecks and it's true color, but it's beautiful!

And really...even if they start to chip....what's the big deal to spray over it again!  It's SO much cheaper than buying a new one!!!
Read more ...

"Fake" Wainscoating

Okay, so here is my first attempt at a blog. I keep having requests for the blogs that I watch and the ideas that have been inspiring me. First of all----I am not individually creative. Even if you tell me an idea, I will not know how to do it until I see it. I have enjoyed the work of the women before me....paving the way to a creative (yet thrifty!) home.


So here is my first BIG project....creating "fake" wainscoating. Thank you to Thrifty Decor Chic for her tutorials and pictures. You made our hallway possible!

  The whole project cost about $45 because I already had the paint and I realized that I can NOT use a meiter box so I got $8 back from my return!  (Thanks, Dad, for the use of your compound--fire-powered one!)  I also realized that unlike Thrifty Decor Chic, I am TOO cheap to actually make the cuts myself.


After my first corner that I cut too short...I let my hubby take over measuring and cutting.  Thankfully, we were able to salavage that piece!

It took FOREVER to find the molding to make the boxes.  If you go to Lowe's, ask for "base cap."  It's plastic and somewhere in the molding section.  I finally printed a picture and sent it with my husband! 


Overall, I just LOVE it!!  The white added so much light to the hallway.


Now...to enjoy it for the next 2 hours until the dust starts accumulating on it, the scuff marks blackened it's white beauty, and dirty little fingerprints are left behind.....

Read more ...
Related Posts Plugin for WordPress, Blogger...